Handling File Uploads in Express with Multer

Hello reader, in earlier blogs for express, you have learn how to send data through payload and through url, i.e. using url parameters and query parameters, this blog is dedicated to uploading file in express. on paper it might look similar to JSON but it varies from it. By the end of blog, you would be confident to design routes to upload your own files in express.
Why file uploads need middleware
Handling normal data (using JSON) is quite simple for express, you simple do:
app.use(express.json())
and this shall parse all the incoming request body for you in proper way.
However it is different in case of a file upload. Files do not come as mere JSON, but they come as multipart/form-data. This format:
Splits data into multiple parts
Sends file as binary chunks
Mixes text fields + files together
Now this is something which cannot be parse by default, and till the time of writing this blog, express does not have it's own middleware which you would simply use and get started with file uploads. So without any middleware req.body is incomplete and file data is not accessible. This is why we need a specialised middleware which can handle multipart/form-data and make development process related to files easier.
What is Multer ?
In the above section you understood that express is incapable of parsing files, and we needed a specialised middleware to do our bidding.
Multer is the protagonist of this blog. It is a middleware built specifically to handle file uploads, multer is built on top of busybox. What is busybox is the scope of some another blog, we are here to understand how to work around with multer and get file uploads integrated in out backend systems.
Multer does all the heavy lifting for the file upload operations:
Reads incoming stream
Parses multipart data
Extracts files
Stores them (disk or memory)
It makes them available in:
req.file   // single file
req.files  // multiple files
Upload lifecycle
Now that you have understood that why we are using multer for, it is important to understand where it sits in the upload lifecycle and what exactly happens at each step.
Client uploads file
        ↓
Multer middleware intercepts request
        ↓
Parses multipart data
        ↓
Stores file
        ↓
Attaches file info to req
        ↓
Route handler runs
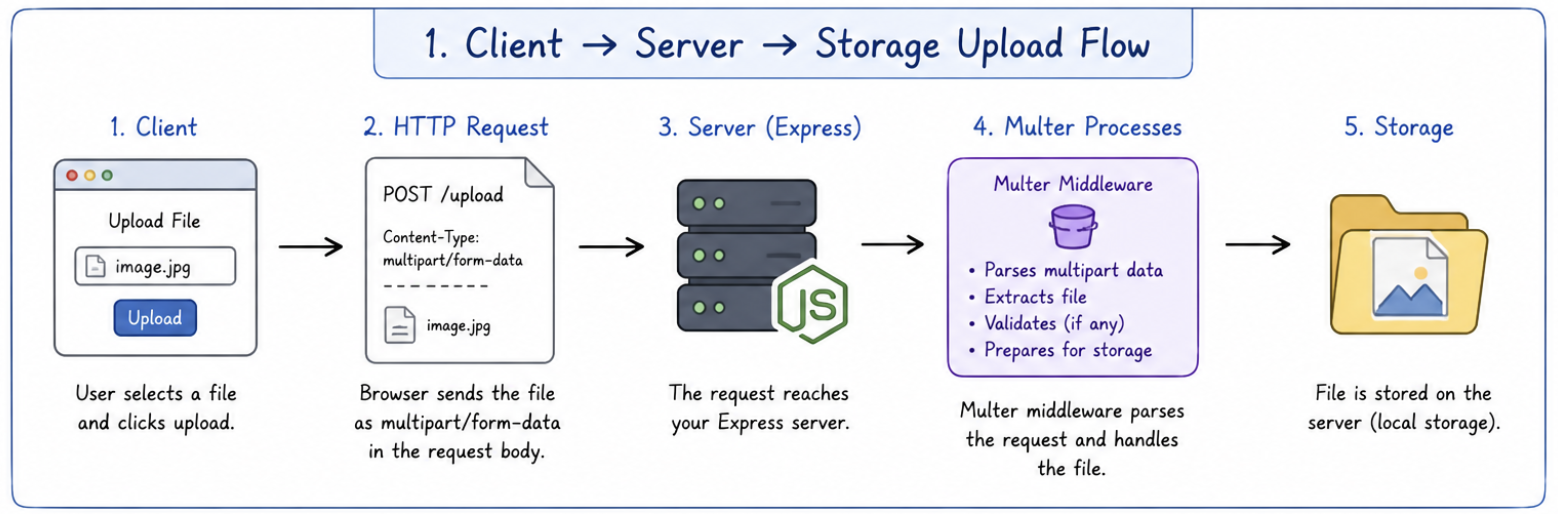
1. Client uploads file
The process starts from the client (browser or app ) usually through a form.
<form action="/upload" method="POST" enctype="multipart/form-data">
  <input type="file" name="photo-file" />
  <button type="submit">Upload</button>
</form>
Notice the important part:
enctype="multipart/form-data"
This tells the browser:
“I’m sending files, not JSON.”
Instead of a clean JSON object, the request becomes a stream of mixed data:
file chunks
text fields
metadata
The second thing worth noticing is:
name="photo-file"
Here photo-file is the field name. When the browser sends the request, it packages the file like:
photo-file: <actual file data>
So photo-file becomes the key for that file in the request.
2. Multer middleware intercepts the request
When the request reaches your express server, it doesn’t go directly to your route handler. Multer sits in between, just like any middleware:
app.post("/upload", upload.single("file"), handler);
Here, upload.single("photo-file") runs before your handler. Notice in the previous step we discuss about photo-file. This is where it connects with the multer, and you must use the same field name.
If you don't match the file name that you used in the client side then:
Multer won’t find the file
req.filewill beundefined
3. Parses multipart data
Now multer takes control of the incoming stream. You are spared from coding from scratch handlers to listen the stream i.e. you no longer need to use req.on("data") , buffering chunks or parsing boundaries. Multer shall read the stream and separates file data from text fields and understands multipart boundaries. Multer does all of this behind the hood.
4. Stores the file
Once the file is extracted, Multer stores it based on your configuration:
Disk storage → saves file to a folder
Memory storage → keeps file in RAM
Example:
const upload = multer({ dest: "uploads/" });
File is physically saved before your route runs.
5. Attaches file info to req
Saving the files isn't the last step in multer, because multer goes to next level and enriches the request object with req.file. The req.file contains:
filenameoriginalnamepathsizeetc.
If there were multiple files then in that case instead of req.file you get req.files.
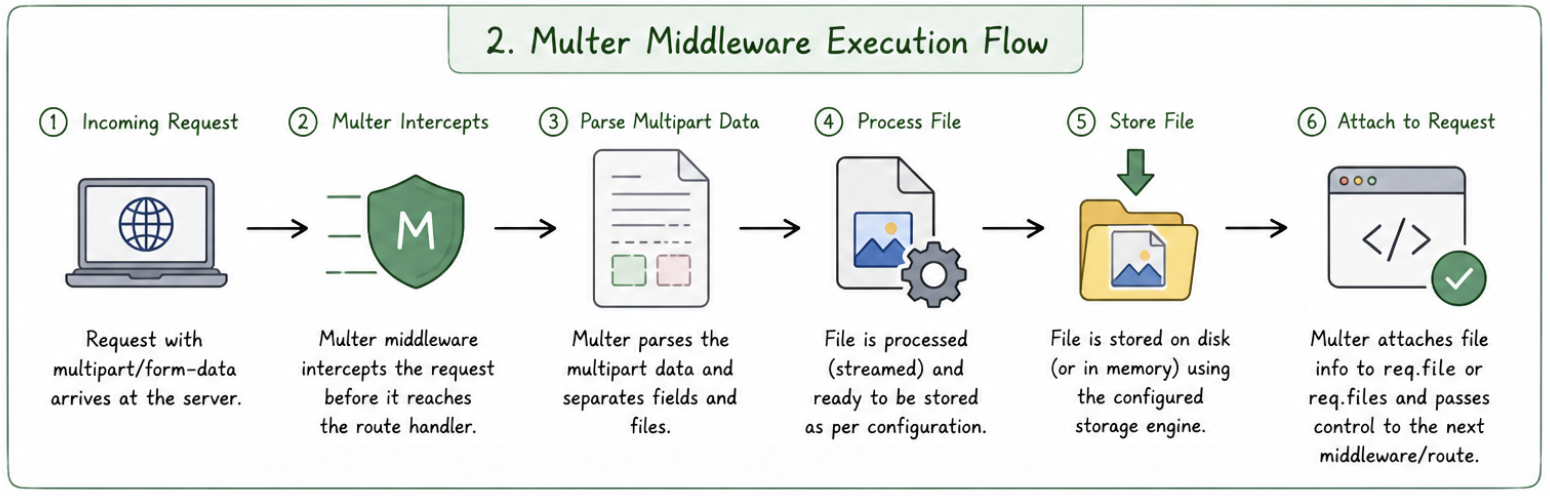
You see your route never deals with raw file streams, multer processes everything before your logic even starts. Understanding the lifecycle shall help you:
Debug issues like missing files
Know where validation should happen
Understand why middleware is required
Avoid trying to access
req.filebefore Multer runs
Setting up the multer middleware.
In most blogs that you read on this topic will provide the below code to set up the middleware:
const express = require("express");
const multer = require("multer");

const app = express();
const upload = multer({ dest: "uploads/" });
well the above code will work but this isn't project ready, I won't even use this in a fun project, because it's like having the infinity stones but not using them at all. Let us set up our middleware for multer:
npm install multer
The very first step is to install multer, then let us see the rest of process in parts:
1. Storage
First you need to understand where you want to store the file that is uploaded, you have two options with you:
Disk Storage
Memory Storage
The memory storage engine stores the files in memory as Buffer objects. It doesn't have any options.
const storage = multer.memoryStorage()
const upload = multer({ storage: storage })
We would be using Disk storage in this blog:
const storage = multer.diskStorage({
  destination: (req, file, cb) => {
    cb(null, UPLOAD_DIR);
  },
  filename: (req, file, cb) => {
    const ext = path.extname(file.originalname);
    cb(null, `\({Date.now()}-\){crypto.randomBytes(4).toString("hex")}${ext}`);
  },
});
There are two options available, destination and filename. They are both functions that determine where the file should be stored.
destination is used to determine within which folder the uploaded files should be stored.
Both of them receive a function, the first parameter is the express request, the second parameter is the file to be uploaded and third is a callback. The callback will take the first parameter as error.
You would want your files to have unique names and it's upon you how you would manage them.
2. Limits
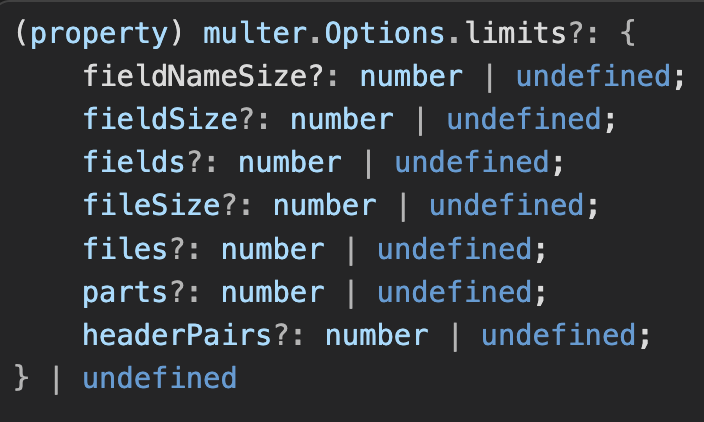
You might want to restrict the user from loading too big of a file, because it could cause strain on your memory.
const limits = { fileSize: 5 * 1024 * 1024 };
The file limit is in bytes, so if you want to allow only 5mb then it's 5*1024*1024. Limit does not deal only with file size but there are other things you might want to limit as in below diagram:
3. File filter
You might want to check if the file uploaded by the user is the file that you accept or not, if not then you should throw an error in that case.
const fileFilter = (req, file, cb) => {
  if (["image/jpeg", "image/png", "image/gif"].includes(file.mimetype)) {
    return cb(null, true);
  }
  return cb(
    new Error("Invalid file type. Only JPEG, PNG, and GIF are allowed."),
    false,
  );
};
In the above function I have decided only to accept images and nothing else.
Now that you have the major setting, it's time you combine them:
export const upload = multer({ storage, fileFilter, limits });
you are exporting your multer as upload middleare. In the next section let us learn how to use this upload middleware.
Handling file uploads
1. Single file upload
To handle single file uploads you simply do:
app.post("/upload", upload.single("file"), (req, res) => {
  console.log(req.file);
  res.send("File uploaded");
});
2. Multiple file upload
app.post("/uploads", upload.array("files", 3), (req, res) => {
  console.log(req.files);
  res.send("Multiple files uploaded");
});
Serving uploaded files
You can access the files that you stored, you simply need to serve them
app.use("/uploads", express.static("uploads"));
Now this means that the same file shall be available via:
http://localhost:3000/uploads/filename.jpg
If you want the file to ben sent for the user to download you can do:
app.get("/download/:filename", (req, res) => {
  const filePath = `uploads/${req.params.filename}`;

  res.set({
    "Content-Disposition": `attachment; filename="${req.params.filename}"`
  });

  res.sendFile(filePath, { root: __dirname });
});
What these headers do Content-Disposition
attachment; filename="image.jpg"
This tells the browser:
“Don’t display this — download it as a file”
Without this header
Image → opens in browser
PDF → opens in viewer
With this header
- Forces download dialog
Even cleaner way is to take from express because express already provides a helper:
res.download(filePath);
This internally:
Sets
Content-DispositionSends file
Security (BONUS)
Temporary Files
When using Multer with disk storage, files are written to disk immediately. This means that even invalid or malicious files are temporarily saved on your server.
Because of this, it is important to treat uploaded files as temporary until they are validated. If a file fails validation, it should be immediately removed from the filesystem.
Failing to do so can lead to unnecessary storage usage and potential security risks, especially if unverified files are left accessible on the server.
A common practice is to delete invalid files right after validation or use a temporary folder for uploads and move only valid files to a permanent location.
Securing the flow
You have already set up a basic level of file validation through multer, but there are hackers, who can bye pass the system like:
Fake file extension: Rename a malicious file:
virus.exe → image.jpgYour system sees
.jpgand allows it.Fake MIME type: Multer relies on
file.mimetype, which comes from the client.
An attacker can send:Content-Type: image/jpegEven if the file is not an image.
Changing file Content: A file can:
Look like an image externally
But contain malicious payload inside
This is especially dangerous when:
Files are executed
Or processed by other systems
import { fileTypeFromFile } from "file-type";
import fs from "fs/promises";


export const uploadImage = async (req, res, next) => {
  try {
    if (!req.file) {
      return res.status(400).json({
        error: { message: "No file uploaded" },
      });
    }

    const filePath = req.file.path;

    const type = await fileTypeFromFile(filePath);

    const allowedMimeTypes = [
      "image/jpeg",
      "image/png",
      "image/gif",
      "application/pdf",
    ];

    if (!type || !allowedMimeTypes.includes(type.mime)) {
      await fs.unlink(filePath);

      return res.status(400).json({
        error: { message: "Invalid file content" },
      });
    }

    res.status(200).json({ message: "File uploaded successfully" });

  } catch (err) {
    next(err);
  }
};
The above code block uses an npm package file-type which shall help us in determining if the file is what it says it is.
Conclusion
Uploading files seems like a difficult task if you are not aware with the basics, but once you are familiar with the lifecycle and libraries like multer, it is a piece of cake.
Happy Coding !


